QUANTA X-RAY:
|
(30 minutes)
This tutorial assumes you have no previous knowledge of the use of QUANTA and so gives you 30 minutes to practice manipulation of the display and positioning of the main view.
To complete this tutorial, you need a licensed copy of QUANTA that includes either of these modules:
This example requires the file start.tar.Z. <Shift>-Click on it to copy it to your area. Then click OK in the next window that comes up. Make a note of the directory into which the file is going to be saved.
Now cd to that directory. Uncompress and untar the file by typing:
uncompress start.tar.Z
tar xvof start.tar
Now type:
cd start
And start QUANTA:
quanta
After QUANTA has finished loading, select Applications / X-AUTOFIT. This starts the application.
The following palettes appear:
While the following remain visible:
Throughout these tutorial the following notation is used:
The main QUANTA graphics window will contain a molecule of insulin and a contoured section of map at 1 and 2 sigma. You should learn to move the picture using the dials and virtual track ball option in QUANTA now. (This is where you use the mouse to manipulate the view; this is by far the easiest way to control the display.)
A) Make sure that you can change the scale, xy position, and xy orientation of the picture before you continue.
B) Make sure you can move the pointer (the white rhombohedral at the center of the picture).
C) Move the mouse to an atom position and click the left mouse
button. This identifies the atom. If you click a symmetry atom (coloured
blue = real symmetry; colored red = NCS symmetry), the label appears white
and be preceded by a # symbol.
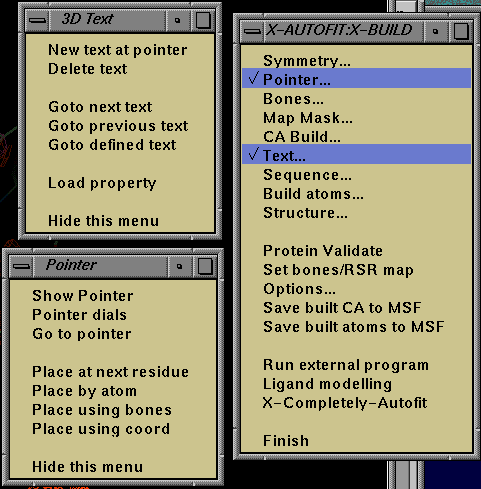
D) Changing the center of the view. There are several methods of changing the view center in the X-RAY applications. In all cases, you will find that the symmetry atoms and map (and bones, if on) are recalculated for the region of interest. Make sure you can see the Pointer palette. If you cannot see the palette then click on the top bar of the X-AUTOFIT:X-BUILD palette to move this to the front, and click on the Pointer... tool: the palette will appear.
This moves the screen center to the currrent pointer position.
This command varies according to the current residue. It moves the view to the next residue in the sequence (except where the step value has been changed). The current residue in this tutorial is residue 1 of segment A. This will be changed if you click on the Ramachandran plot or use Place by coord or Place by atom.
This prompts for an atom name. Try segment = B, and sequence = 4, atom = CA
You cannot use this option in this tutorial, as bones are not turned on. In the third tutorial you will find that bones are active.
This waits for an atom pick using the left mouse button button while pointing at an atom. Look at the bottom of the graphics window at the message line. Pick atom is displayed, and the Place using coord tool remains highlighted until you make a pick. Note, if you miss an atom when you click, nothing happens.
The Ramachandran plot is at the bottom right of the screen. It is currently quite small, so make it bigger by picking up a corner with the mouse and dragging. (The non-glycine residues are shown green, and glycine residues are shown blue, and the current residue (if defined) is shown red.) Pick a blue circle with the mouse. The blue circle turns red, as this is now the current residue, and the molecular display has changed to center the glycine you picked.
If you cannot see the 3D Text palette, select the Text... tool on the main X-AUTOFIT:X-BUILD palette to bring the 3D Text palette to the front. Ttext strings are already added in this tutorial. You can get to the first text string by picking the tool Goto previous text. This takes you to a yellow text mark {text string 1}. Now pick Goto next text, and you will move about 8 Å to another text mark {text string 2}.
These text marks allow you to label parts of the model for future reference. You will become very familiar with these during the subsequent tutorials: these will mark locations and tell you what to do at various points in the structure.
Move the pointer using the virtual track ball option somewhere else in the structure, or use one of the other placement options described above (the pointer will be reset to the new screen center). Now select the tool on the 3D Text pallete New text at pointer. You will be prompted for a text string. Type in a string of characters, and hit OK. The new text string will appear. You can go to the various text string in the structure using either of the tools Goto next text, Goto previous text or Goto defined text.
If there is still time left, try using the Load property tool on the 3D text palette.
If there is time, look at the Options... tool on the X-AUTOFIT:X-BUILD palette.
You will find various options that control the functionality of the X-RAY applications. Try to change the symmetry radius to 50 and click OK. A large selection of symmetry atoms is displayed after about 1-3 seconds. Now change the value back to 12.
For all the subsequent tutorials, all these parameters will be set to sensible values for the particular tutorial, you are recommended NOT to change any option before completing any of the tutorials.