This chapter describes the basics of using the QUANTA Molecular Editor for editing 3D structures and preparing them for various operations and calculations. It also includes a description of additional editing options, including the Atom Property Editor available on the Edit menu in the Molecular Modeling menu bar. This chapter should be read by all QUANTA users.
The Molecular Editor provides tools to construct and modify any 3D molecular structure. The application's basic editing capabilities provide ways for you to add or delete atoms, change atom types, and build a structure by merging a number of molecular fragments.
If you want to combine structures stored in more than one MSF into a single MSF, open the files before you enter the Molecular Editor. Use the Save As selection in the Molecular Modeling File menu to combine the structures into a single MSF.
The Molecular Editor also prepares a structure for CHARMm operations. It assigns atom types and charges to all atoms and satisfies valence requirements by adding hydrogens to the structure during editing procedures.
When you exit the Molecular Editor, a final valence check is automatically performed to minimize inconsistencies that may have occurred during editing. A single MSF is created even if multiple fragments exist. You also may choose to create a CHARMm RTF for a single fragment. After the MSF and any optional RTFs are created, QUANTA returns to the Molecular Modeling application.
The Edit menu includes other editing options including Bond Options, Atom Data, and the Atom Property Editor. Each of these operates on molecular properties defined in an MSF.
Although the Molecular Editor allows 3D structures to be built by merging a number of molecular fragments, it is often faster and easier to sketch the base structure in ChemNote. This approach also may provide a more accurate structure for beginning your 3D editing procedures.
ChemNote checks each sketch for unattached atoms or bonds, unknown CHARMm atom types, and net charges before 3D conversion takes place. If any inconsistency is found, a dialog box is displayed that identifies the problem and provides a set of options for resolving it. Only when the 2D sketch is verified as correct, does ChemNote convert it into a 3D structure file.
Use the following exercise to create a base structure for editing in the Molecular Editor. If you have not built 2D molecules in ChemNote, go through chapter 1 of this volume before continuing.
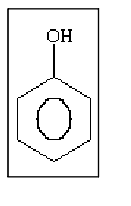
In the Molecular Modeling window, display the Applications menu. Select Builders, then select 2D Sketcher from the pull-right menu and the ChemNote window is displayed.
2. Return the phenol structure to Molecular Modeling
Display the File menu in the ChemNote window and select Return to Molecular Modeling. A dialog box asks if the changes made are to be saved.
The ChemNote window is removed from the screen and the Molecular Modeling window is reactivated.
The phenol.mol file is automatically converted to the MSF phenol.msf. A dialog box gives you the choice of using either the structure that was just created or another MSF. Select the option:
The structure phenol.msf is displayed in the viewing area. The textport message indicates that 13 atoms are active, and the Molecule Management Table displays the status of phenol.msf.
The Molecular Editor provides tools for editing bonds and molecular fragments. Some of these editing tools include functions such as adding and deleting bonds and fragments, replacing and merging fragments, and changing bond types.
Editing tools are located in the Molecular Editor palette that opens when you select Molecular Editor from the Edit menu in the menu bar. This palette can also be accessed through the Applications menu in the menu bar by selecting Builders and then 3D Builder from the pull-right menu.
The palette functions like other QUANTA palettes. When a selection is chosen, it is checked and highlighted to indicate it is active. Some selections remain active until they are manually turned off or until another selection is made. Other selections are automatically turned off when the associated function is complete
Table 11 lists the Molecular Editor palette selections with a brief description of each.
Use the following exercise to become familiar with the Molecular Editor.
Display the Edit menu and select Molecular Editor. The Molecular Editor palette replaces the Molecular Modeling palette.
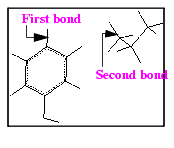
2. Change a bond in the phenol ring
Pick bond to change.
Position the cursor over any bond in the phenol ring. Click the left mouse button. The bond is briefly highlighted, indicating it is selected, and it changes from an aromatic bond to a single bond.
It changes to a triple bond and then back to an aromatic bond.
3. Change the display to a Kekule Structure
See Table 12 for a list of selections in the Edit Bonds palette and a brief description of each.
Select Display Kekule Structures. The bonds in the aromatic ring change to alternating double and single bonds. Select Display Kekule Structures again. The display returns to aromatic bonds.
Select Display Fragment Table from the Molecular Editor palette and the Fragment and Categories Tables open on the left of the viewing area. A number of categories of fragments are available in a scrolling list in the Categories Table.
Select the category Functional Groups and the Fragment Table displays functional group fragments in a scrolling list. If you click Toggle Icons at the top of the table, the list displays both the name and a chemical representation of each fragment.
Click the propyl fragment in the Fragment Table and a propyl fragment is added to the viewing area. Click only once since additional clicks add additional propyl fragments.
The message in the textport reads:
Adding fragment .../quanta/fragment/propyl.mol
The number of atoms listed in the Molecule Management table changes to 24.
Again click Display Fragment Table to deselect it. The Fragment and Categories Tables are removed from the screen.
Select Move Fragment from the Molecular Editor palette then select any atom in the propyl fragment. Use the translate and rotate dials in the Dial Emulator to position the fragment so that the propyl structure is fully visible relative to the phenol structure.
5. Merge the propyl fragment with the phenol ring
The Move Fragment dials are automatically closed and the message line reads:
The bond is briefly highlighted, indicating it is selected, and the message line reads:
Pick the second bond to merge.
The selected bonds are joined, merging the propyl fragment with the phenol ring. The selection is automatically turned off when the merge operation is completed. The number of atoms listed in the Molecule Management Table now reads 22, because two atoms were eliminated in the merger.
6. Rotate the structure for better visibility
Press and hold the middle mouse button while moving the mouse to rotate the structure until all bonds can be seen. Release the mouse button and the structure stops rotating.
The Fragment Table can easily be customized to contain your own fragments, in the form of ChemNote .mol files, or to present the categories in a different order if you use some more often than others.
Make a copy of the file $HYD_LIB/fragment.lib. Make this copy editable (chmod u+w fragment.lib) and read it into an editor. Add a line consisting of the pathname of a directory containing a collection of .mol files, followed by a description. You can add as many lines as you wish if you want to organize your fragments into separate directories to constitute your own categories, and rearrange or even comment out any of the standard categories you don't want to use
Your modified fragment.lib file can be placed either in the directory from which you run Quanta, or you may wish to create a directory containing this and other default files which can be anywhere, pointed to by an environment variable QNT_USR.
If you want to minimize the coordinates in your .mol files, without altering the 2D coordinates which are used to draw the icons in the fragment table, there is an unsupported utility available accessed by the command Z118.
There are several options for adding, changing, and editing atoms in the Molecular Editor. You can add or modify oxygen, carbon, or hydrogen by using the Add Atoms selection in the Molecular Editor palette. When you select Add Atoms, a palette is displayed. Table 14, lists the Add Atom selections and briefly describes each.
If you want to make changes with elements other than hydrogen, carbon, or oxygen, use Change Atoms in the Molecular Editor palette This selection opens a dialog box where you enter the element of your choice.
You can edit atoms singly or in groups by using the Edit Atoms selection in the Molecular Editor palette. When you select Edit Atoms, a palette is displayed. Table 14, lists the selections on this palette and provides a brief description of each.
New atoms are named by adding a sequential number to the element name (O1, O2, O3, H1, H2, H3). An automatic renaming procedure executes when you exit the Molecular Editor to ensure atom name uniqueness. This procedure is selected as a default in the Editor Options dialog box.
Atom names as well as other important information about each atom in the structure are used as atom labels by selecting Display Atom Labels from the Molecular Editor palette. This selection provides atom label information each time it is used in the following cycle: atom names, residue names, atom types, atom charges, no labels
Three tools are provided in the Molecular Editor palette for working with hydrogen.
Altering the molecular structure by adding or deleting hydrogens as well as making other structural changes requires atoms to be retyped. There are two typing procedures: automatic and manual. Automatic typing is done when you exit the Molecular Editor. If the parameters you are using differ from the defaults, they need to be redefined.
You initiate manual retyping by selecting Type All Atoms in the Edit Atoms palette that opens when you select Edit Atoms from the Molecular Editor palette.
Complete the following exercise to become familiar with procedures for adding or modifying oxygen, hydrogen, or carbon atoms to a structure.
Select Display Atom Labels from the Molecular Editor palette to cycle through the various label options: atom name, residue name, atom type, atoms charge, or no label.
Each time the selection is chosen, the labels cycle to the next option. Cycle through until you return to the atom name option.
2. Display the Add Atoms palette
Select Add Atoms from the Molecular Editor palette and the Add Atoms palette opens over the Molecular Editor palette.
3. Convert a hydrogen to a hydroxyl group
Pick atom to convert
4. Convert a hydrogen of the terminal methyl group to an amine group
Pick atom to convert
The geometry is regularized for the MSF.
5. Exit the Add Atoms palette.
The palette is removed from the screen.
6. Display atom types information in the atom labels.
Select Display Atoms Labels from the Molecular Editor palette and the labels change from atom names to residue names. Choose the selection again and the labels change from residue names to atom types.
7. Delete two methylene hydrogens from the alkyl chain
Pick an atom to delete
Select the two methylene hydrogens in the alkyl chain and these atoms are removed from the structure.
The atom type changes from CT to CH2E for the carbon in the alkyl chain where the hydrogen atoms were deleted automatically.
8. Add hydrogens back to the structure.
Hydrogen atoms are added back to the structure, satisfying valence requirements. The atom type automatically changes from CH2E back to CT for the carbon in the alkyl chain where the hydrogen atoms were added.
Structures created with the Molecular Editor may not have accurate geometries including bond lengths and bond angles. These geometries can be refined using an energy minimization process before you exit from the Molecular Editor. The process is initiated by selecting CHARMm Minimize from the Molecular Editor palette.
The energy minimization process also may be initiated by selecting CHARMm Energy from the Modeling palette. Chapter 3, Calculating and Minimizing Energy, is devoted to a more extensive description of energy minimization.
The following exercise goes through the minimization process as it is executed from within the Molecular Editor.
1.
Setup minimization for the displayed structure.
For each data field, enter the values indicated:
Number of Minimization Steps: 50
Coordinate Update Frequency: 5
Energy Gradient Tolerance: 0.010000
Energy Value Tolerance: 0.000000
Initial Step Size: 0.020000
Step Value Tolerance: 0.000000
The dialog box is cleared from the screen and new minimization parameters are established.
2. Start minimization for your structure.
As the CHARMm calculation starts, the cursor changes from an arrow to a clock. The message line and textport display minimization information during the CHARMm process.
Minimization is completed when the cursor is restored to an arrow. The minimized energy result is displayed in the upper- right corner of the viewing area and reported in the textport.
If you wish to repeat minimization using another minimization method, repeat Steps 1 and 2, making selections appropriate for the method you choose.
When you exit from the Molecular Editor, your structure is saved using options specified in the Editor Options dialog box. These options specify whether atoms are retyped or renamed, if charges are assigned, or if an RTF is created.
Charges are assigned using QUANTA charge templates or the Gasteiger method. The charge templates are derived from the CHARMm RTFs used for proteins and peptides. The templates have been expanded to include drug ligands and some polymers. In general, charge templates can be used for any molecule that can be successfully typed in the Molecular Editor. Gasteiger charge methods should be applied to molecules that cannot be typed by in the editor.
The Editor Options dialog box is displayed when you select Editor Options from the Molecular Editor palette. By selecting Prompt for Options during Exit in the dialog box, you choose to have a similar dialog box displayed each time Save and Exit is selected from the Molecular Editor palette.
Table 15 summarizes the Editor Options listed in the dialog box.
The following exercise takes you through the Save and Exit procedure.
1. Save the structure and exit the Molecular Editor
Select Save and Exit from the Molecular Editor palette and a dialog box displays the default saving options:
Reassign atom types
Reassign atom charges - Use Charge Templates
Rename Atoms Automatically During Exit
A dialog box prompts you to choose the method for adjusting charges.
In response to a prompt from a File Librarian dialog box, enter the name search1 in the filename data field and click the Save button.
The Modeling palette replaces the Molecular Editor palette.
You can work on several structures at the same time. When you have multiple MSFs open in the Molecular Editor, the final Save Options dialog box differs from the one displayed when you save a single MSF.
If you want to combine structures stored in more than one MSF, open the files before you enter the Molecular Editor. Use the Save As selection in the Molecular Modeling File menu to combine the structures into a single MSF. Then proceed to editing.
The following exercise creates an additional structure and MSF using ChemNote and the Molecular Editor, then leads you through the save and exit process with several MSFs.
1. Create methanol in ChemNote
Display the Applications menu. Select Builders and then 2D Sketcher from the pull-right menu that opens.
In the ChemNote window that opens, sketch the structure methanol (CH3OH) and save it as methanol.mol.
2. Return the methanol structure to Molecular Modeling.
A dialog box asks if the changes made are to be saved.
A File Librarian dialog box opens.
In the smoothing dialog box, the smoothing algorithm adjusts the net charge to zero using the atoms you select.
The ChemNote window is removed from the screen and the Molecular Modeling window is reactivated.
The file methanol.mol is then automatically converted to the MSF file methanol.msf. A dialog box gives you the options of using either the structure that was just created, another MSF file, or one added to the other.
The structure methanol.msf is displayed along with search1.msf in the viewing area. The textport message indicates that 31 atoms are active. The Molecule Management Table displays the status of both search1.msf and methanol.msf.
3. Restart the Molecular Editor with multiple MSFs
The Molecular Editor palette replaces the Molecular Modeling palette and the textport reads:
Only one MSF can be active in the editor at one time,
search1.msf will be kept active.
The Active cell in the search1.msf changes from Yes to No. The bonds of the methanol structure brighten while the bonds of the search1 structure are dimmed.
5. Move the methanol fragment.
Pick atom in fragment to move
The Fragment & Set Transformation Dials (Dial Set 2) are displayed.
6. Convert methanol to methylhydroxyl.
The Add Atoms palette is displayed and the Molecular Editor palette is removed.
Pick atom to convert
Pick a hydrogen in methanol. It is converted to a hydroxyl group.
The Add Atoms palette is removed from the screen.
A dialog box lists each of the open MSFs that can be saved.
The 3D Molecular Editor Save Options dialog box displays the default options:
Reassign atom types
Reassign atom charges - Use Charge Templates
Rename Atoms Automatically During Exit
In the File Librarian dialog box, enter the new name methylhydroxal in the filename entry field, and click the Save button.
The Molecule Management Table updates to a new name and new number of atoms.
The Atom Property Editor item in the Edit menu provides editing options, using a consistent interface, for atomic data functions contained in an MSF. This editor provides functions for editing residue and segment data as well as atomic data. It does not allow reordering of atoms or residues. The Atom Property Editor operates using a combination of the Property Editor palette, dialog boxes and the Atom and Residue tables.
Table 15 lists the selections in the palette and provides a brief description of each.
The Atom Table is an editable table containing one row per atom. For multi-residue structures, this table does not appear by default. It can be generated by selecting Atom Table from the Property Editor palette or by double-clicking rows in the Residue Table. Only atoms that are currently displayed (visible) are listed in the table. For large structures, the table can display atoms, one residue at a time.
Table headings for the Atom Table are, from left to right:
The table is automatically updated if the coordinates are changed using Coordinates from File, if residue centers are changed, or if a different fourth parameter is loaded. Altering data in the table automatically causes labels to be redrawn or a new conformation to be displayed.
The Residue Table is an editable table that is displayed when the structure to be edited contains more than one residue. If you double click with the mouse on a residue row or it you select Atom Table from the Property Editor palette, the Atom Table is also displayed. Double clicking a residue row when the Atom Table is displayed removes the atoms in the residue from the Atom Table.
Table headings for the Residue Table are, from left to right:
The Atom Data selection in the Edit menu opens a pull-right menu that allows you to make changes in an atom charge, atom type, or other atom parameters such as hydrogen bonding or Emin values. The changes are made in dialog boxes that open when you make a selection from the pull-right menu.
The Bond Options selection in the Edit menu displays a dialog box where bond options are selected.
The Molecular Editor provides tools to construct and modify any 3D molecular structure. The application's basic editing capabilities provide ways for you to add or delete atoms, change atom types, build a structure by merging a number of molecular fragments, and prepare a structure for CHARMm operations. It assigns atom types and charges to all atoms and satisfies valence requirements by adding hydrogens to the structure during editing procedures.
Editing tools for this applications are located in the Molecular Editor palette that opens when you select Molecular Editor from the Edit menu in the menu bar.
Although you can build molecules from scratch, it is generally easier to begin construction in ChemNote, moving to the Molecular Editor when you have completed the basic structure.
Structures created with the Molecular Editor may not have accurate geometries. These geometries can be refined using an energy minimization process before you exit the Molecular Editor. The process is initiated by selecting CHARMm Minimize from the Molecular Editor palette.
In the Molecular Editor, a single MSF is created even if multiple fragments exist. You also may choose to create a CHARMm RTF for a single fragment. After the MSF and any optional RTFs are created, QUANTA returns to the Molecular Modeling application.
The Atom Property Editor provides editing options, using a consistent interface, for atomic data functions contained in an MSF. This editor provides functions for editing residue and segment data as well as atomic data. It does not allow reordering of atoms or residues. The Atom Property Editor operates using a combination of the Property Editor palette, dialog boxes, and the Atom and Residue tables.
The Atom Data selection in the Edit menu allows you to make changes in atom charge, atom type, or other atom parameters such as hydrogen bonding or Emin values.
The Bond Options selection in the Edit menu give you options for editing bonds.